File Size: 3.92 MB
Downloads: 1,866
Rating: 5.0 (22 votes)
Description
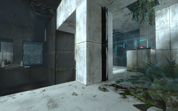
An easy/medium difficulty destroyed chamber.

Comments
Sign in to comment.
The four check indicators next to the big fizzler are confusing. I thought I needed 4 buttons/laser/thing to remove the field but the two buttons where enough.
Compounded with the lack of order hints, I spent quite a while trying to open the exit door thinking I would find the other triggers for the big fizzler, until out of frustation I used noclip and saw the elevator.
I don't see what the indicator on the left of the exit door does. I didn't need to light it to have to door opened.
I like to look of the map but a bit less light coming from the two big observation rooms would be better. The white walls in those areas are a bit to saturated (compared to other maps).
The last laser target, I lighted it using portals in the laser source area to send the laser at an angle across the room. Is that the official solution?
Similarly, I also used used two reflector cubes to light the first laser target to free the portals. Is that also supposed to be used that way? The lack of room to place to cube (e.g. one need to be really next to the source, aiming nearly at the corner of the platform with the button) makes me doubt it.
Uhh yeah. I screwed up. This map was based off one of my earlier attempts at a test chamber, I revived it, and now I just realized that I uploaded an older version. Hold in there for a bit while I try to get the newer file.
Perhaps I just got lucky, but I liked this map. Everything came intuitively to me. Used the first cube to get the 2nd, then both cubes to get the 3rd.
Only part I may have strayed from the intended solution was to stack 2 cubes to get up to the final laser target and put a cube on that button.
FWIW, nicely done map.
Okay. If life gives you lemons, make lemonade. Since I couldn't find the newer map, I did a quick fix of the major problems with the old one. There are still issues, but that's the best I can do right now. Sorry for the inconvenience.
jimmyb wrote:
Only part I may have strayed from the intended solution was to stack 2 cubes to get up to the final laser target and put a cube on that button.
You don't have to get a cube up there in that way. Here is my solution:
First put a cube on the button which can let the fizzler in that small room disappear. Then put a portal below the cube-dropper and another one on the portal surface opposite the small room. Go press the button and a new cube is dropped down and flies into the small room. Use the two cubes in the main chamber to direct the laser to the receiver and activate the lightbridge. Use the lightbridge to get into the small room and put the cube that is already there right onto the button.
This map was great! I downloaded it last night before I went to bed so I guess I still have the old one. It took me about twenty minutes to solve it. I found it very challenging at some parts, and I liked the multiple uses of the testing elements. The only con I have it that next to the Hard Light Bridge there is a pile of debris inside the fizzler, which made it difficult fr me to hit the Laser Catcher to activate the Hard Light Bridge Other than that I don't see anything wrong with this map.
Solid, complex medium-lenght map in average Decay style - despite everything being very functional. Puzzles nicely ramp up in difficulty, particularly the last one where the delivery of the cube to the small room isn't so clearly cut. There's multiple ways to do so, the easiest being to just throw it and possibly a couple more signs would make that operation more clear.
Notably cared after to prevent exploits, check those corners and see how you cannot snipe anything. Suggested to all.
Bug: you get stuck in an invisible wall where the fizzler should be, if you stay in the small room and have a cube flinged from somewhere to a portal in front of you.
Dont tell me that the solution was to <br />||throw the first cube in the little chamber and put the second on the edge of it. Because that would be no good solution. I just couldnt see another way to get a cube in. The first is needed to deactivate the fizzler and the other two are needed to activate the wallbeam to get in. Or shouldn`t you use the wallbeam to get in?
EDIT: Just read your post. Now I know how I should've done.||
I loved the ambiance. The feel was perfect...I stayed in the elevator room for a couple of minutes just listening to the crickets and birds. There were nice touches all around, water dripping, plants swaying, and the carnage/overgrowth of the chamber felt perfect.
Puzzle was challenging, but logical. I liked that you had to come up w/ roundabout ways to accomplish tasks that would seem straightforward w/out the fizzlers. Activating the lightbridge the first time, for example -- there's the very obvious portal, portal, activated method...until you realize that won't work. Then you have to come up w/ a plan B. I love that. 
As for the button in the small room at the end ... I just executed a fling on the cube by placing a portal under the drop area, and one across from the room. Then I kept hitting the drop button until the cube landed on the button. Took maybe 10 times.
Overall, this was one of my favorite custom maps thus far. I only had one piece of feedback:
- The button that activated a Discouragement Field -- not sure what that field really did, since it seemed to disappear soon after, and never really prevented the player from any task he would have taken anyway (since I only really ever portalled to the secondary area, never walked there)
nice map, solutions are in plain view, we just have to work around and do each task in the right order, after some trials and errors. great sense of accomplishment in tne end.
however, one thing to comment
for people who are curious they would press on the button for the bbq grill (can't find the name for this thing) they would eventually solve it. but for people who play it safe and don't see the point getting themselves stuck might not press this button at all and might go on a wild goose chase
that said, it's still a great map.
I'm playing custom maps and record my first time of playing them. So the run is not perfect and may not use only intended ways, but maybe it can let you see how other people may understand the map or you could just enjoy someone playing this map for entertainment.
Anyways, here is the recording:
q0M4MxaTXOI
(Link: http://www.youtube.com/watch?v=q0M4MxaTXOI)
Also note the video description for more feedback and my signature for additional project information.
Well that certainly got the wheels turning! Great challenge, thanks! To put the cube in the small room I just jumped up and placed it there. I was worried it was too close to the fizzler but it turned out fine. Your way is good, but I wouldn't have remembered which cube came from that cube dropper and I didn't want to fizzle the wrong one.
Nezzy, This is my very first post here. I registered just to leave you some feedback. I have played all but a couple of the 5-star SP custom maps. I'm not sure what the star rating are based on but I'd give yours 6 and here is why.
I never no-clip. I would rather watch/read a walkthrough if I get that stuck; only up to the stuck part though. For me It's all about the puzzling. I've got to give kudos to the people who feedback on glitches and bugs, but those who complain they "had to go to noclip" are NOT making lemonade, they are sucking lemons. XoP
sp_fun_with_fizzlers was an incredibly enjoyable map for me. No gimmes, no arrows, no hints that I caught, just straight forward chambers built on logic and creativity. If it makes me a noob that I spent 1.5 hours solving it, sO-bE-iT. (it was probably more like 2 hours lol) But that IS what I paid for, enterfrikkentainment! Got my money's worth tonight. That'll be fun to replay as well. I'm making note of the longer, more complex maps for replay later. (yours is the 5th one) THAT'S a compliment for sure in my opinion.
I have to add that most of the mappers here are uber talented and I can't wait to see more of your stuff. Do any of you ever get together to test out Co-Op maps? I have a TeamSpeak 3 server and 6 people paired into 3 games of Co-Op and all on same voice chat is hilarious. (done it)
Anyway Nez, thanks for your time and talents, thank you very much and keep it up!
All of you be well
Dawg out.
A very good head-scratcher.
I don't think I'm giving anything away here to make the general comment that it can be frustrating to go through the trial and error of figuring out the quota of cubes, prisms, balls, etc. for each map. It doesn't require dexterity or thinking so it doesn't really add to the game. For this map in particular the number of dispensers might be an indication, but it's still a crap shoot until you solve the puzzle. I suppose that given the (for lack of a better word) atmosphere of Portal that posting that info on the entry sign would be out of place. Again, this a general comment on maps in general and not a knock on this most excellent adventure.
KennKong wrote:
Now this is a map done right. It plays as good as it looks. 'Nuf said, 5/5.
Precisely this. It was easy/medium difficulty as you stated, but actually the intended solution is medium difficulty and it's only really easy because of the alternate (easier) solutions. But nonetheless, it was fun and a well-designed map; good work.
An easy/medium difficulty destroyed chamber. , but it's all good now.
There was a small debacle where an old map got uploaded
File Name: Fun With Fizzlers.zip
File Size: 3.92?MiB
Fun With Fizzlers