The Thread For Small Problems And Requests

josepezdj wrote:
@yishbarr: won't a local files cache verification return the instance back to you?
I don't know. According to some people, that that only works with configuration files for the program without the actual readables, but maybe you're right.
TeamSpen210 wrote:
Here you go: departure_elevator_a4_base.vmf
Thanks.
Lunch wrote:
Well, I published to see if it work. It does, butA) Cave doesn't speak at the beginning (I didn't use an elevator to start the map -- you just drop in from a vacuum tube. Could that be why?)
B) It doesn't really end? The trigger for @relay_pti_level_end doesn't do anything.
Check the instance: you might've accidentally changed the instance file. If you didn't, are you SURE that you put it in the right location? Should be in Portal 2\sdk_content\maps. If it's not in there, get it in there. It will not detect the instance if it's not in the proper folder.

What's the best/prettiest way to make a base for a weighted button? My button looks... less than impressive.
quaternary wrote:
Noob question time again!What's the best/prettiest way to make a base for a weighted button? My button looks... less than impressive.
If you look under sdkcontent\maps\instances, in one of the folders there's a stock base for them. I don't remember exactly which folder, but it's there somewhere. It has black/white and clean/dirty versions.
quaternary wrote:
Noob question time again!What's the best/prettiest way to make a base for a weighted button? My button looks... less than impressive.
You must empty the central part a bit. Try taking a look to Valve's instances as CJLerch suggested. The 'classical' ones are at:
C:\Program Files (x86)\Steam\SteamApps\common\Portal 2\sdk_content\maps\instances\buttons\button_pieces
PTI ones are into (these include the floor_button as well):
*
C:\Program Files (x86)\Steam\SteamApps\common\Portal 2\sdk_content\maps\instances\p2editor\floor_button_black_intact.vmf
C:\Program Files (x86)\Steam\SteamApps\common\Portal 2\sdk_content\maps\instances\p2editor\floor_button_white_intact.vmf*
You'll see that they split a 8 units brush horizontally and then clip the upper part, texturing the parts under the button usually in the toolsblack texture.
I read on the developer wiki that refract shaders don't work on world brushes, so I tried it on a func_brush and it still doesn't work.
Is there a way to make this texture work correctly? Am I even interpreting how it's supposed to look correctly?
-
You need to erase the parameter $model 1. This makes the material ready to be used in models only.
-
In order to turn the material into a glass when applied to world brushes, you should add the parameter $translucent 1, otherwise it'll have a solid look being impossible to see through.
-
Even though for models the parameter $basetexture works fine, you can't use it in world brushes. Here you need to replace it by the $refracttinttexture one. However, you can't use the lightcover texture (materials\glass\refract_light_color.vtf) here since it lacks from .VMT file and you'll see a purple checkerboard in game instead. There's a trick if you really want to use this one, to add the ".VTF" file extension inside the .VMT like so:
$refracttinttexture "glass/refract_light_color.vtf"
I don't really know why and how you want to use this, but take into account that the alpha channel for the texture to be used here is the key. For instance, that texture "glass/refract_light_color.vtf" has the oval white shape with transparency (in order to let the light to pass through) while the rest (the gray one) is totally opaque (to avoid the light from passing through). You might consider making a custom texture for this according to what you need.
-
There are a couple of parameters intended to be used in models only, which effect in world brushes is weird, so you better erase them:
-
$localrefract 1
- $localrefractdepth "0.05"
That's all you need to change 
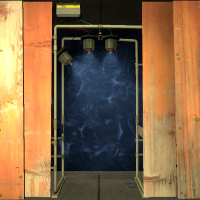
Take a look to the attached material. I just modified the "materials\glass\glasswindow_refract01.vmt" for you according to the above explanation. I added a custom texture that I used in my map Oxygen Station for the window glass in my observation rooms. I made it with ripples that fit the normal map (which is the one that is actually causing that "curly" refracting effect in game). Also, note that for the several lightcover types (warm, neutral and cool) the only param that changes is the $refracttint one, you might want to play with those values to get your desired color.
Good luck!
Although this is mostly unrelated to the problem, I wanted to thank you for all that material info!
I've been wanting to use a simple refracting glass texture for a while, so using parts of what you said, I simply copied the .vmt for observation glass, renamed it, gave it a $refracttinttexture target of my own creation, and voila! Observation glass on more than just observation windows!
Thanks! If I ever feel I need tinted versions I can probably just repeat the process with different tint textures.
 Also it seems like $translucent isn't needed in this case.
The reason I wanted it is because I'm trying to make something that looks like a narrower version of the standard light strip. Having gotten the texture working though I think I'm going to have to try another route. The texture looks too... flat? Like it doesn't have the depth of the normal light strip (which I know is a model), and the white oval doesn't look distorted enough.
I've successfully popped a sorta-working FoV slider into the Video Settings menu, which was fun. Basically I took video.res, tweaked it to include a field-of-view slider, and packed it into dlc3. That was easy and it even works too! (sorta hehe)
Now I'm trying to add more buttons (and another menu! wow) to the in-game pause menu (for demos), but I'm running into trouble.
a) Which res file do I need to edit to do this?
b) Will it also work in Puzzlemaker maps or do I need to edit another file?
c) Is this even possible at all, lol, am I crazy.
I tried adding new entries to ingamemainmenu.res, but it's not working (just uses the same menu)