File Size: 0.83 MB
Downloads: 2,952
Rating: 4.5 (10 votes)
Description
Using bridges the right way is key in this map Playthrough: http://www.youtube.com/watch?v=JEQCYTd9Ptg improvements to first version: -add 1 small puzzle -added a panel instead of a block -removed portable walls, preventing confusion

Comments
Sign in to comment.
Looking good so far but we're kind of stuck. Only the second time that my buddy and I ever got stuck in a custom map, so congratulations. 
We completed the first part and have the companion cube at the upper walkway. Any hints how to get past all those fizzlers and reach the upper walkway?
@Calculator Look around and see if you can find a way to bridge climb anywhere in the turret room.
QuothTheRaven wrote:
@Calculator Look around and see if you can find a way to bridge climb anywhere in the turret room.
What we tried
||If we let the bridge go horizontal, we see two placements:
- We can place it at the far wall but then it hits the glass. The bridge won't go through the glass or the fizzler.
- We can place it at the wall on the right next to the damage field. Then one player could stand on the bridge while the other raises it up to the fizzler. This means that the other player stands inside the fizzler and can't shoot any portals to extend the bridge above the fizzler.
Then we thought of placing the bridge at an angle using the sloped platform in the first room, but this requires both sets of portals. If one player goes through a fizzler then the other player would have to catch him somehow by placing a horizontal bridge underneath him. However, we can't figure out where we could do this without getting blocked by glass, fizzlers or the damage field.||
We'll give this map another try tonight and see if we can come up with anything.
One small possible improvement: if the turrets are meant to be indestructible, place them behind a metal grill. No need to confuse the players by letting them think they can kill them.
Calculator wrote:
This means that the other player stands inside the fizzler and can't shoot any portals to extend the bridge above the fizzler.
Tip: press space 
Calculator wrote:
One small possible improvement: if the turrets are meant to be indestructible, place them behind a metal grill. No need to confuse the players by letting them think they can kill them.
ok done
We didn't figure out how to do the first part, so we used reportal glitch to get up to the button.
h3X wrote:
We didn't figure out how to do the first part, so we used reportal glitch to get up to the button.
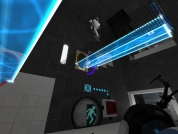
I thought that was pretty easy (but cool nonetheless). The screenshot at the download page is a small hint towards the solution.
Solution to first part
- Get on the hard light bridge by extending it and going through the portal.
- Using portals to create a sloped bridge, get on the metal grill.
- Make stairs by extending the horizontal bridge. When you're on the next step, replace the portals so you can extend the bridge onto the next step without falling off.
- Repeat until you're at the top.
We gave this another try. We still haven't figured out the right solution to get up to the catwalk, but we did find another way.
Alternate solution
First you get your partner on a bridge with his feet in the horizontal fizzler closest to the chamber entrance. Your partner then jumps on the edge of the glass panel to get out of the fizzler. From there, he can shoot a portal on the wall and on the ceiling and get on the catwalk.
I know it's not the indented solution, but we couldn't figure it out and it started to get frustrating. I'd like to know the "real" solution though... Anyone?
it is possible to jump and then while in the air shoot 2 portals so that u land on the new extended bridge (its not so hard to do atleast with a mouse)
so its more or less the solution you found.
Dakoon wrote:
it is possible to jump and then while in the air shoot 2 portals so that u land on the new extended bridge (its not so hard to do atleast with a mouse)
so its more or less the solution you found.
||If the bridge has to be extended over the fizzler, then it has to touch a portable wall somewhere above it. We couldn't find any spot where the bridge would go over the fizzler though.
Perhaps a screenshot of where the bridge would have to be placed (before/after jump)?||
Me and my friend spent about 45 minutes on this, got the cube but then got stuck and didn't know what the hell we were supposed to do. We both agreed it sort of lacks direction.
Where did it get stuck ?
Repressing the button creats a new one
Walkthrough:
http://www.youtube.com/watch?v=JeS_0pwAmZA
Dakoon wrote:
Walkthrough:
http://www.youtube.com/watch?v=JeS_0pwAmZA
Spoilerish opinion
||So the solution consists of finding a small spot where the fizzler is a tiny bit lower at the edge of the wall, then jump and shoot two portals just above the fizzler? You need some serious precision and speed to pull that off!
If your first portal is too low, you hit the fizzler and when it's too high, the bridge doesn't go through it. Even if that works, you still need to turn around and shoot a second portal.
Your solution may be very original, but most regular players (including me) wouldn't be able to figure that out. I think you need to add more directions to help finding the solution or revise that part of the puzzle.
Here's a possible alternative. Make a small wide but small gap in the glass above the danger field and put a fizzler inside the gap. The player can first lift his partner to just below the fizzler just like in your current version. Finally, he puts his portal as high as possible so the bridge goes through the gap in the glass (the portable wall may need to be higher for this). Now his partner is standing on the bridge above the fizzler and can extend it to reach the upper walkway.
Overall, I liked the map. It's just that one part with the bridge and the fizzler that I find frustrating.||
if you want everyone to quickly shoot 2 portals (seen in 1:40 of your walkthrough), then remove the little ledge behind you. can jump on it and stay out of the fizzler, having enoug time to shoot the 2 portals relaxed.
found it to be better this way though (jumping on the ledge that is)
also (don't know if possible) it would have been uber awesome if you had to trap the cube @ vertical cube button with a light bridge.
smashy wrote:
if you want everyone to quickly shoot 2 portals (seen in 1:40 of your walkthrough), then remove the little ledge behind you. can jump on it and stay out of the fizzler, having enoug time to shoot the 2 portals relaxed.found it to be better this way though (jumping on the ledge that is)
Yeah read that this is possible above already. I have no problem with that solution because my solution is a bit hard to find.
smashy wrote:
also (don't know if possible) it would have been uber awesome if you had to trap the cube @ vertical cube button with a light bridge.
good idea -> implemented
We found this level pretty challenging as we weren't exactly sure how to get up in the second area (we figured it out eventually). And we ended up dying a hell of a lot to those damn robots!!!
Overall it was a fun time though and we do love trying to avoid killer robots ;P In the end we completed it in a similar way to your playthrough with a few alterations (You probably don't want to watch this if you haven't completed this map yet)
vFwYSrBXtPg
thanks for that video. It was realy fun to watch. Well done how u solved the steps in the first room didnt think of that.
It seems like the video isnt as new as your post because it shows the first version of the map with no fence in front of the "killer robots" ^^. After watching it i removed a few white walls because its just confusing.
edit: lolz i think all my new uploads didnt work and ther was all the time the first version online -.-
and even now i dont realy know what i did to get it working. This upload system sucks
Better late than never, amirite? I had completely forgotten about this one.  2-parter short map with a platform bit and another, more controversial turrets-heavy one. It's not like the latter is frustrating, as we still managed to crack it in 5 mins: it's the intransigence involved which leaves you gasping for air.
We immediately thought the invincible, super damage turrets were fixes to prevent exploits: but as it is, they look like a weird mix of intentions between a sound puzzle and a horribly punishing level. Might be a case of overfixing!  On a side note, we routinely ran behind the floor level turrets to avoid them: I guess that might not be the intended solution.
I'm playing custom maps and record my first time of playing them. So the run is not perfect and may not use only intended ways, but maybe it can let you see how other people may understand the map or you could just enjoy someone playing this map for entertainment.
Anyways, here is the recording:
AphYbayGXAw
(Link: http://www.youtube.com/watch?v=AphYbayGXAw)
Also note the video description for more feedback and my signature for additional project information.
Using bridges the right way is key in this map
Playthrough:
http://www.youtube.com/watch?v=JEQCYTd9Ptg
improvements to first version:
-add 1 small puzzle
-added a panel instead of a block
-removed portable walls, preventing confusion
File Name: mp_coop_hardbridgev3.rar
File Size: 848.84 KiB
Click here to download Hard Bridge