File Size: 3.07 MB
Downloads: 1,428
Rating: 4.76 (21 votes)
Description
A map in the Destroyed style, and consequently involving malfunctioning/overgrown/broken elements. Not everything in this map works toward the solution, even though it may have been part of the original chamber Anyway, a chance for me to work on lighting, scenery and sound as much as anything. All intelligible comments are very welcome Revision R1b: Thanks already to folk pointing out an exploit in the last area - since fixed @ 16:00 GMT 28/08 Also a potential trap alluded to by xdiesp in the unlit area opened by the first box-button - fixed @ 12:15 GMT 29/08 Revision R1c: Altered the second chamber to negate the obvious (Once Portal2Two had shown it) easy way to deal with the turrets there - talk about blinded by your own routine! - fixed 18:00 GMT 31/08

Comments
Sign in to comment.
Potential good map. There are a pair of things that are useless:
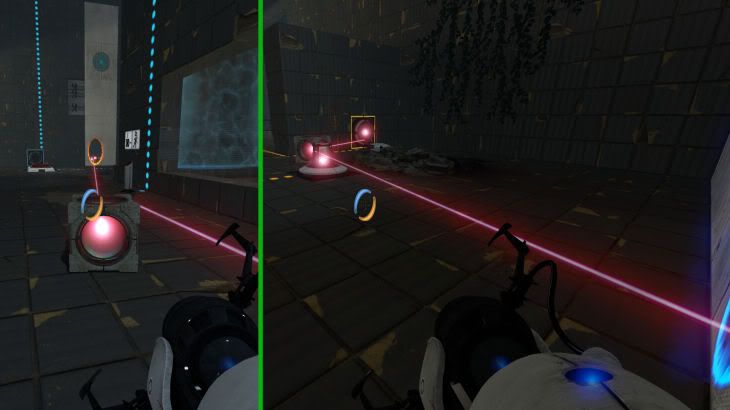
1. The square-shaped red button where the turrets are, supposedly for getting the hard light bridge. You can easily get the light bridge through the broken glass on your right side.
2. The square shaped red button in the second room. I don't really know if I didn't do in the intended way, or I missed one cube or... I don't know how you want the player to finish it... but I had to finish it this way:

One redirecting cube in the main room poiting to the opossite corner in the second room (this is the only place where you can get the desired angle), and the other redirecting cube in the second room poiting towards the 2 targets. Then, as there was not any other cube, I couldn't activate the stairs to the exit, and it was not reachable, except by painting a bit of blue on the ground and jumping.
I hope my comments helped you somehow! Cheer up!
And thanks for mapping
Thanks for the reply josepezdj - I see you solved the map exactly as I intended.
The reason the map is called Workaround is because those elements you mentioned are broken/useless. This makes the player have to find alternative solutions - which is exactly what you did.
The window is broken to let you bypass the overgrown area, and the first half beam can be redirected to replace the one blocked off by the fallen tiles - though you have to bounce out with a well-placed blob of gel - like you did ^^
I'm not sure if this idea will make folks pleased they overcame the damage or bothered by the redundant items - I hope you liked the setting of it all, anyway
Hehehe... well, it's in fact funny the way you have for approaching to the map creation, and of course tricky. Anyway, people don't use to like those useless elements. My suggestion is that you break them in the first use of them (as it happens many times in the original game because of Glados' special sense of humor) in order to clarify about your intentions... give it a think.
Btw, I forgot to mention:even though your intentions is to force the player to think all around and find solutions, I spent much time until I found the laser target that removes the emancipation fields of main room! at least place a symbol near that...
Anyway, I enjoyed. And no bugs to report btw.
That's a good idea, I'm not sure how to do it, but I'll surely see if I can break at least that last button - anyone know what signage would represent emancipation grids, though?
I did a quick gameplay video of the map so far. I thought this map was a lot of fun to play and had several enjoyable "A-HA!" moments.
fG7qXym4lYY
A few notes:
Notes
1. It's very possible to defeat the turrets (1:53) without using the blue gel. Doing so on my first playthrough robbed me of a BIG hint towards the solution.
2. Despite the name of the map I spent a lot of time trying to figure out how to activate the stairs along with the lasers. Maybe showing the stairs as broken or unusable, as you did with the second laser, would help?
3. A small visual thing - playing on low graphical settings makes the first room (0:07) look like half the floor is solid yellow. It wasn't until I rendered my video in Source Recorder that I could see it for what it really was - semitransparent liquid.
4. It's possible to coat the surface you launch off of to get the second cube (0:35) a bit too close to the edge - and if you do so it bounces you up instead of forward.
5. Could you give us a sliiiightly bigger space to stand on (1:00)? In my first playthrough I kept slipping off to my doom! 
That's brilliant awkisopen, thankyou for posting that - wierd to see someone else running around a map I made!
Especially odd to see a whole other solution to the second set of turrets - I was thinking they were for burning with the beam. As you say though, you perhaps don't realise what the gel does in the second half that way. ^^
I replied to josepezdj about the last box button - when I've time I'll break that better - so to speak.
As for the first puddle of water, I'm not happy with that opening corridor anyway, but thanks for the heads up about how low-end machines handle such stuff.
Reality will keep me from tinkering for a bit, but i hope I can address both your points with an update soon - meanwhile thanks again for showing my little map in action.
I meant to record another quick playthrough to show off the update and another way of killing off the turrets at the end, but I ended up breaking the map instead! Whoops!
YcLM85qWFQo
Could you give us some water, please? I know it's a pretty obscure thing I did but it does make finishing impossible.
Edit: D'oh! I just realized that I can destroy the cube and drop a new one instead. Yes, it took me hours to figure that out for some reason.
A map in the Destroyed style, and consequently involving malfunctioning/overgrown/broken elements.
Not everything in this map works toward the solution, even though it may have been part of the original chamber
Anyway, a chance for me to work on lighting, scenery and sound as much as anything.
All intelligible comments are very welcome
Revision R1b:
Thanks already to folk pointing out an exploit in the last area - since fixed @ 16:00 GMT 28/08
Also a potential trap alluded to by xdiesp in the unlit area opened by the first box-button - fixed @ 12:15 GMT 29/08
Revision R1c:
Altered the second chamber to negate the obvious (Once Portal2Two had shown it) easy way to deal with the turrets there - talk about blinded by your own routine! - fixed 18:00 GMT 31/08
File Name: Workaround_R1c.zip
File Size: 3.07 MiB
Click here to download Workaround
THX for mapping! 
Great, but: I can survive goo for a short time. ...make it purposely?
Well, here and there things rather slope off into a goo pit - having fallen there, the second or so's delay is to make stumbling into these not instantly deadly.
That said, if folk think it's compromising the map at all it's an easy tweak.
Thank you for the comment though, Hope you liked the look of it too
I solved the 2nd room swimming through the toxic, no idea what i should do instead.
Edit: Ah, i got it now. In that case you definately need to make the toxic deadlier.
I haven't played it yet, but maybe you could use a separate trigger_hurt in the shallow parts, so that part will be less deadly but the other parts will be like usual.
Thanks Greyhound for pointing out the unintended exploit, and Marise for the advice about tweaking things.
This setting was originally to allow the player to scrabble out on the slope if their fling from the first room Target onto the gel was interrupted by (as occasionally happens) clipping the edge of the portal and slowing their momentum.
Clearly this has left an unintendedly broken moment so having acted on Marise's advice, all other goo has been returned to its regular toxicity - and a blob more debris ought to close that exploit outright.
Enjoy your testing, and thanks again for the feedback - hopefully the style at least is now the only broken part of it all 
Two medium chambers in Decay, not so atmospheric but quite the destroyed kind with plenty debris blocking both the way and the solution (apparently). Pretty tough early on, later lowers in a long outro.
Specifically, the first chamber hosts one particularly twisted fizzler-based test: not impossible, but kind of the time waster kind. A couple bugs though: if you portal to the little room when it's closed, you're stuck; the target on the wall, for the gel jump, is 1 tile too high - it easily becomes a stressor that way.
The second looks tame in comparison: reach the place, press a button and you're out - if I may suggest, place the cubeplate right in front of the turrets and force the player to provide the lasercube from CH1 (or even the laser, if you can pull this). The water damage being lower than usual helps with the aforementioned big jump.
Gosh, I wish I could identify your descriptions - can you do your walkthrough in a linear fashion (with spoilers where required), I'm sure I can tweak it if you make any sense in english?
I had the Trigger_Damage for the last leap disabled, though i can't remove the excess splash from the portal transition's seeping into the water texture beneath - any ideas?
Use your extensive level-creating knowhow if you can - thanks!
Oh and did you like the theming/lighting - god knows it took fucking ages but no-one seems interested in it - and you know how hard it can be, right?
Helpful as ever....
Found the trap though, after scratching my head awhile over your description - a repair has been made - you can 'waste' more time testing it if you like
I got to the exit, though I had to quickly disable the last batch of turrets, not sure if that was the intended solution, but I can't figure out how one is actually supposed to reach the exit
Hopefully this chamber works well enough now to post a meaningful walkthrough, which I hope helps you, Soundlogic, so here : http://www.youtube.com/watch?v=nUbt82eYZlI
Sorry if it's rather dark, I don't know why Youtube does this to my videos, it looks fine on my PC - hope it provides the salient points though
I quite enjoyed playing this map. It looks just right for a decayed style map, and the puzzles were just complex enough to make one think a bit. The unused puzzle elements didn't lead me too far astray in finding the solution.
I liked that there were more than one way to solve portions of the puzzle, without resorting to exploits. For example, I found two different arrangements for the laser cubes in the first room, both different from the one in your playthrough video.
One exploit I did find was you can wall walk the lightbridge through the stairwell and out to the exit. However, since this is actually quite a bit more work than the intended solution, I wouldn't worry about it.
Edit 8/31/2011: Not an exploit, my mistake: I had noclipped to look around the map and had left the lightbridge in the first room. It will fizzle out when you went through the door.
The only problem I had playing the map was with the fling to the gel, which was hit and miss (and miss and miss and miss) for me. A little less portal material so that the optimum portal placement is quicker to find wouldn't hurt.
Summary: Looks good; moderate difficulty on the puzzles; low difficulty on player skill; short but not too short. I give it a 4/5.
Absolutely brilliant map - I spent a lot of time searching for the workaround solutions you created. Loved it, look forward to more....Thanks for creating. 5/5
Thanks very much for your comments KennKong, I did know there was at least one other arrangement for the cubes in the first chamber :
http://i1141.photobucket.com/albums/n58 ... Lasers.jpg
Not sure what else you found, nor what your Spoilered exploit consists of, exactly, as in just what wall walking is and where you did it, but I'm certainly glad you liked the setting. Breaking and decorating was a big part of what i tried to learn here.
I'f you've a moment to PM about the gel-fling issue you had I'll happily poke at that too ^^
Tell you what Portal2Two, you've just shown me a right weak spot in my intended solution by being able to reach those last two turrets just by lifting up the cube, rather than using the way I designed!
I might even have to tinker with that bit, but it's great to get someone else's detailed take on things in order to do that, so thank you. Hope you had fun with the rest, anyway
Jane_Doe wrote:
Tell you what Portal2Two, you've just shown me a right weak spot in my intended solution by being able to reach those last two turrets just by lifting up the cube, rather than using the way I designed!
I might even have to tinker with that bit, but it's great to get someone else's detailed take on things in order to do that, so thank you. Hope you had fun with the rest, anyway
He, he, oh well,
Quote:
... my intended solution by being able to reach those last two turrets just by lifting up the cube, rather than using the way I designed!
Wasn't that the intended solution really?! What is it then?!
Quote:
It's great to get someone else's detailed take on things in order to do that, so thank you. Hope you had fun with the rest, anyway
Sure, the map was interesting to me. Thank you for creativity.
Well now I had to tweak it, Portal2Two, since you Un-spoilered the way you did it!
(Revision posted around 6 pm GMT)
Hope you have chance to try it again, apologies to those un-troubled by that pair of turrets before now ^.^
Jane_Doe wrote:
Well now I had to tweak it, Portal2Two, since you Un-spoilered the way you did it!(Revision posted around 6 pm GMT)
Hope you have chance to try it again, apologies to those un-troubled by that pair of turrets before now ^.^
Yup, got your nightly build, pretty cool Jane. Yea, now I see there's a much easier way to fight those two:
Good work, I rated it "5/Excellent".
Awesome level! Tricky level, at times hard, but the goals to every step always remained clear, so to not discourage the player.
Just two quick pointers: With the repulsion gel dispenser, I was able to place gel to where the cube goes,as shown.
And the other thing is was it meant to be able to place a portal to the muck? Picture here. I dunno. But really nice level, well thought out, and I love the Announcer saying "Well done. You trapped yourself" and then letting you out. XD I didn't even know the Announcer could say that!
Hehe,thanks wolf bytes, I'll address your points in order. Well, yes (see KennKong's post and my reply), and....er, no, that's a bug, though I suspect not a helpful one.
Thanks for the post though, I'll add the latter bit to any further fixes - and I was almost happy to have the Trap moment pointed out, so I could use that clip! Made the whole impenetrable post worthwhile to realise I could use it ^.^
Hey Jane!
Great the latest version of your map. It was already good as WIP when I tested it in the first place and posted my comments. I must point out the same "buts" as then though: you could just remove the final cube button in chamber 1 because of 2 reasons. The first one is that there are a couple of easy ways to finally reach the exit without the use of that button; I don't think anyone will waste one of the 2 necessary cubes in there... once you understand it's impossible to get out without one of the 2 cubes, you think of the blue gel for reaching the exit ledge; because it's impossible to place the portals letting the laser beam through diagonally so it can turn on the 2 targets, so you need both cubes for the exit door. The second reason is that, after crossing the exit door, you leave with a feeling of "I think I didn't do it the intended way"... Anyway, there is an asset to you: I think that the no removal of that cube button makes the final room more challenging because it distracts you thinking of how to take 1 cube for that button, and use the remaining cube for bringing the laser (which is not enough). I repeat my best solution for this cube button: make it breakable when the player firstly use it and see the stair; you just need some sparks, a noise and a failure in the lights... This way, the player thinks of it as a tricky maneuver (like Glados' ones), and starts to think of a different and deep solution
I never tested the second chamber before and I like it. Very well done in destroyed theme(I like the way you connect both chambers with the destroyed doors and the metal stairs). Easy puzzle though... but fun (I like the final fling... I'm a fan of fling)
I've recorded a playthrough:
_sXKpoIofEw
Thanks for mapping!
Thanks for the new Walkthrough josepezdj, and your supportive feedback all through my versions of this map, it's been really helpful.
I think, though, that I did actually take your advice ^.^ . In your walkthrough, I didn't see you try a box on that stairway button, but if you do try it, you'll see those stairs are definetely going to need working around, sparks and all!
Mostly though, you flew through it, and even dealt with those last 2 turrets like I'd intended - even though there's a weak spot in that bit, (Portal2Two shows that in his last video by going in and grabbing them, when I intended them to get lasered, the way you did it - I'd need another grille in their little alcove to enforce that, I guess) but then I kind of like both possible answers, so I may just leave that.
Anyhow, thanks again for such positive feedback throughout. I know some bits just don't work as part of the solution now the chamber is decayed, but I hope taking yours and others' advice has meant they're more clearly 'broken' and it's still fun.
Dear Jane,
I feel very stupid. I didn't even try the button at all! It is great what you've done! I'm so sorry to have posted again about that without even try.
Regarding the turrets, yes I think the best would be to put some of those metal grilled boxes so they cannot be taken.
My best regards.
Great level! I got very confused near the end of the first part, though, and decided to watch the walkthrough. It seemed like there were too many loose ends and I didn't think I dealt with the turrets the way you're supposed to, so I thought I'd skipped some important step. The broken exit stairs had me confused as well. If I'd kept the name of the level in mind, that might have helped.
Overall a very cool map; I liked the complexity of the puzzles but did encounter one issue:
If you place the portal on the target up on the wall when trying to put blue gel on the ledge, it paints the wall above it, and when you launch yourself through, it is impossible to go across. You bounce back every time. I've tried placing a portal just below the target, but because of the automatic positioning, anything less is too far down and will not clear the gap. Needless to say I got pissed and noclipped across there - consider replacing the wall above with a grate so the gel cannot stick.
IridescentShadow wrote:
it is impossible to go across. You bounce back every time. I've tried placing a portal just below the target, but because of the automatic positioning, anything less is too far down and will not clear the gap. Needless to say I got pissed and noclipped across there - consider replacing the wall above with a grate so the gel cannot stick.
With due respect to your feedback, did you try placing a portal right on the target?
Thanks for testing IridescentShadow, however I'm afraid I just don't see your problem.
That jump has been mentioned before, and I've looked it over literally hundreds of times - the only issue I ever had with it was occasionally clipping the portal sides and falling short into the goo (which I made the shallow part around the part-submerged slope a bit more forgiving to help with)
Other than that, I've just been back to test it yet again, as shown in this video clip:
http://www.youtube.com/watch?v=SjTX2-ip8fY
As you can see I coated the wall from top to bottom to see if that affected it - it did not.
I can only guess that you're trying to steer yourself as you fall, so try not doing that - otherwise I hope that snippet is handy, and you enjoyed the majority of the map
Fantastic map! 5/5, and it is every bit as good looking as the puzzles are well-thought.
I'm playing custom maps and record my first time of playing them. So the run is not perfect and may not use only intended ways, but maybe it can let you see how other people may understand the map or you could just enjoy someone playing this map for entertainment.
Anyways, here is the recording:
9stuJEtWMNE
(Link: http://www.youtube.com/watch?v=9stuJEtWMNE)
Also note the video description for more feedback and my signature for additional project information.
NOW RELEASED - Tweaks to various elements(after feedback), some sound added, and a New Area
Mostly dealing with a map broken by decay (necessitating working around blockages and failings) - and a chance to learn more about lighting and scenery for me.
Now Released, so comment on it there please:
Workaround
File Name: Workaround_R1.zip
File Size: 3.07 MiB
Click here to download Workaround