Portal 2 (Other files)
Miscellaneous Portal 2 mods, assets, tools, and non-map downloads.
Felix Griffin's Editor Mod (FGEMOD)
An editor for the editor, which allows you to choose your test elements. Includes at least as many new ones as there are originals. Includes HMW's mod and the BEEMOD elements. Note: There's currently an error unless you have this package installed: http://dl.dropbox.com/u/51831059/Portal ... _v5_src.7z . Sorry about that.


Gravity Gun instance v2
Place the instance called gravity_gun_automatic.vmf in your map to use. press and hold secondary fire to pull and carry, press primary fire while holding to launch. See the readme for better a better description EDIT: All cubes, paint bombs, and combine balls can be carried now! EDIT: very few glitches now! The only know glitches are the occasional messup on map spawn which can be fixed by reloading, and the ability to shove things under the floor and past doors, but this can be prevented with fizzlers and triggers that send a forcedrop output to the gravity gun. EDIT: Now with particle effects and other awesomeness!
Portal 2 Timers example
=================== Portal 2 timer examples =================== This is just an example map that includes the basics of 2 working timers (a countdown and a countup) that uses custom materials (numbers). The intention is to show the required entities and their inputs/outputs to understand the logic behind a timer made in the hammer editor. Also this method allows you the posibility to use your own custom typo/numbers to fit your map's aesthetics... For this example I used the typo "DIN Next LT Pro Condensed", because I think it's pretty much similar to the typo used by Valve for the signage lightboard; so if you are too lazy to make your own material and want to use it in a normal Portal2 map, it'll look good. So the purpose for this could be considered as merely didactic The basic idea under this method is to make an overlay with 10 frames (the ten numbers, from 0-9) and go changing its textureindex with the entity "env_texturetoggle". HOW TO MAKE YOUR OWN CUSTOM NUMBERS ---------------------------------------------------------------- 1. Open an image editor of your choice, take the font that you like and make 10 separate images, one per number (from 0 to 9), and REMEMBER to always give the image a size which values are a power of 2 (like 128x256 that I gave in this case). I prefer making .png files... you can do .tga as well... Whatever format that allows you recording an alpha channel (transparency) because this way, our numbers overlays would be stickable on whatever texture 2. Name each of them with a name followed by a suffix like "_0", "_1", "_2", and so on... Obviously, try to make that suffix coincides with the number into the image... lol. 3. Now open VTFEdit (http://nemesis.thewavelength.net/index.php?c=178) and go to File > Import. Now select at the same time (holding Ctrl or Shift keys down) all the ten image files. Do not resize the images. You can check into the "info" tab how the file contains 10 frames (each of them is a different number). I also made a cutie dots (":") to separate the seconds from the minutes and make them flicker: for this you need to make 2 textures, one with the dots and other completely empty but with the same size, then do the same as for the numbers, import them with VTFEdit selecting both at the same time. 4. Then save this file as .vtf into your "materials" folder (you can create whatever folder of your choice into /materials of course) giving it a whatever name. 5. Now you should create the .vmt file for the above .vtf file. Both names must be the same, only their extensions change... In this example, my .vmt file contains the following: UnlitGeneric { $baseTexture "josepezdj/numbers/black_numbers" $surfaceprop glass $translucent 1 "%keywords" portal $decal 1 Proxies { ToggleTexture { toggleTextureVar $baseTexture toggleTextureFrameNumVar $frame toggleTextureShouldWrap 0 } } } You can simply copy all that only replacing the path "josepezdj/numbers/black_numbers" by the one where your .vtf file is located and the name of your file. I guess it's clear. However, do not hesitate to ask whatever question or doubt Once created your custom texture for the ten numbers, check inside the attached .vmf in your hammer editor to see how you can set the timers up easily. Read the Readme.txt file for instructions info. A further post with an explanation in detail about how the timer system works is in the topic of this download, for those who doesn't really extract much info from the vmf file... josepezdj

In-Game Timer
This adds an on-screen timer to whatever map you want, without requiring a recompile. Good for speedruns of custom maps. Made by Chickenmobile and FelixGriffin.

Alexander's Bomb Dropper Instance
This is a bomb dropper I made, its pretty good (although I don't know how to make a brush pitch black, if you tell me how I'll add a thin pitch black brush to it so it doesn't look like the bomb is coming from the ceiling). Pretty simple, and if you replace your cube_sphere p2editor instance with this (and re name it cube_sphere), you should be able to use it in the PTI.
Glass Light Instance (No leaking light)
This glass light instance works with 8 thick walls by default, but is easy to modify for whatever thickness walls you want. You can also change the intensity and warmth/coolness inside the instance to fit your needs, as it is currently a neutral light. The point of this glass light instance is to avoid light leaking through and around brushes when using glass lights.
Opposite linkage instance
Opposite linkage is a special mode for Portal 2 Cooperation game, in which players' portals are switched, i.e. ATLAS primary portal is connected to P-body's secondary, and vice versa. Because I don't have time to create maps and I don't want to abandon my hard work I decided to release an instance which I created for this project community-releases/mp-coop-opposite-linkage-first-map-t5873.html . You can modify this file and reupload it, but please credit me (DerpVulpes, a.k. arek_91) as an author.
TWP Advertisements
These are a number of advertisements which have been made by TWP members for the advertisement of our site in game! Well done to everyone who made some awesome stuff. Files included are: Ratman TWP scrawl by zivi7 TWP logo model by Skotty Elevator Animation by PixeledFace http://www.youtube.com/watch?v=SKUdo14NXZM&feature=player_embedded Elevator Animation by Habzs http://www.youtube.com/watch?feature=player_embedded&v=WlIJv7eUie0 Lab monitors by greyKarel Aperture Posters by Brainstone Elevator instance and script by ChickenMobile For further instructions on how to use these advertisements and place it in your map, look at the relevant ReadMe.txt included inside the download. Make us proud TWP, advertise us!

VRAD Lighting Skipper
A quick and dirty program to help dramatically reduce build times in PETI. This program is currently Unsupported as I am working on a far more powerful tool that will include the functionality of the Lighting Skipper.
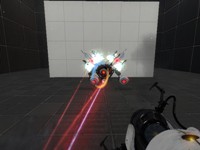
ML's Angry Hover Turret
This is my personal version of the scrapped Hover Turret that didn't make it in Portal 2. It floats in the air while tracking the player with a laser and has two turrets equipped that remain motionless (except when firing). The only way to destroy the turrets is to burn them with the laser, picking up the turrets will NOT work. To activate the Angry Hover Turret properly, trigger the logic_relay with a trigger or something. It is best to copy and paste the Angry Hover Turret rather than loading it as an instance. Known issues: 1)While trying to rotate the Angry Hover Turret, the func_tank that tracks the player may end up firing the laser in another direction. When this happens, simply rotate the func_tank (the clip box) 90, 180, 270, etc degrees until it lines up properly. This takes some trial and error testing but it's not a big deal. 2) When using the reflection cube with the Angry Hover Turrets laser beam, sometime the laser will not reflect in it's current position.