Portal 2
Core Socket Example
Core_socket.mdl usage example. Connect Wheatley to activate some of the testing elements.


[Coop] The Amazing Race
I have uploaded a final version of the map in the Coop Section.
![[Coop] The Amazing Race](/downloads/screenshot/thumbnails/1411_racingpic.jpg)
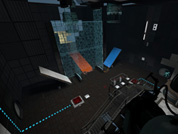
CG's Untitled Gel Puzzles BETA
OK here's the functionally complete, put together gelmaps This is a 3 chamber composite of the two WIP maps I submitted earlier (Bridgeclimb and Gelerase) and a third test chamber (working title: anglebounce) Rather than type up a lengthy description that nobody will read i'll just say "here it is!" Full Wheately themed puzzles mainly involving repulsion gel. Diffuculty: hard PLEASE post me notes on this, any problems, and room for improvement, and maybe some help optimizing the large, open areas (yes I used visclusters.) I need feedback before I do submit v1.0 to the released maps section. EDIT: I just realized that, in area 2, there is a button on the floor to the left as you exit the observation room. The button simply turns the light off and on. thats ALL it does. Pelase ignore it as I was using it to test the lights out part of the sequence im making to go between areas 2 and 3
Time Machine
an easy level with a time machine(actually two) there are a few bugs you may notice anyway enjoy
TLFS Interactive Computer Mechanic
Due some recent stuff i decided to release this, i realized that was stupid from my part hold this only for myself =D. (besides, even that taken me months to figure out how to do it, in reality is not to hard to imagine how it works, so if you want to see how i did here it is =D) --------------------------------------------------------------------------- !!IT'S NOT AN INSTANCE!! Recommended for people that have a more advanced knowledge in hammer. (i will try to do an tutorial, but if someone do first i will be very thankful, because i'm not a very good teacher XD) FILE CONTAINS -. BSP to see how it is compiled - The necessary textures (for you to have an reference for do it your own) - VMF for you study how it works i will be glad if you put my name in the credits if you use =P

KA Level 2
SP KA Level 2 Verison 0.35 This is my second map that is not as normal "Portal 2" maps, but it have some new thinking puzzles some may be better then other (i know of it) Info: Difficulty 2/5 Death-rate 2/5 New thinking 4/5 Included types of moments: A diffrent type of Maze New type of Bridge walking Little speed jumping And some "speedy thing in - speedy thing out" Install and uninstall: copy map to portal 2/portal2/maps (you may delete the old verison if have any "SP_KA_maps_level_2_xxx-bsp"(xxx = verison number) to run map type "map sp_ka_maps_level_1_xxx.bsp" ======Change Log====== V0.36 Bug Fix For metal grid not solid. v0.35 last version ready for WIP release Later Versions Todo List: * Get feedback and fix any bugs or errors.
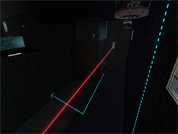
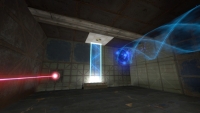
Underground styled test elements
These are instances for underground themed versions of: * laser * light bridge * tractor beam all of which are FULLY underground themed, NOT just the modern stuff re-colored and surrounded with old styled textures, meaning that no modern aperture stuff is visible in any of these outside of hammer. Please give any feedback, and credit me if you use these! thanks. Caden wrote:Screenshots of these instances in action. pics [spoiler] [/spoiler]
FlipCounter Instance (and vmf example)
I made this instance for my map and I managed to make it pretty much user friendly so I decided to share it. So it's basically a flip counter that goes from 0 up to 9(and loops) every time you trigger it. All you need to do is to put it as an instance and name it how you want. Trigger it with anything you want. And also you have a parameter for a starting value. Put any number from 0-9 and that will be the default number when the map spawns. I was having troubles getting the instance to return the value so it can trigger something else so I just figured a way to do that outside the instance with just one math_counter and one logic_case. It's all included in the example vmf. It looks pretty cool, I used panel animation to make the flipping look nicer. Although I wanted to make a real flipcounter where every number is split in half, but that would require twice as many brushes and 10 times a many patience .. it look cool enough Use it however you want, it's my gift to the community. Would be nice to credit me wherever you use it, but I'm not gonna hunt you if you don't
flukes first maps
my very first released maps, there are a few bugs, so if you know how to fix them, please tell. special thanks goes to msleeper and p0rtalplayer, for helping me with my faith plate. to run it, type map tf_map_01 into console. enjoy. *update* changed file type to 2 .bsp. currently working on custom sounds but errors show up saying cannot find it or something. if u know how to help, please do
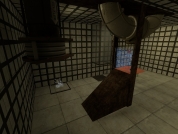
the_surprise_test_chamber
I have been working on this map in my free time since school ended. It features Discouragement Lasers an incinerator and and excursion funnel. Please tell me if anything needs to be fixed or added, Thanks!