Portal 2 (Other files)
Miscellaneous Portal 2 mods, assets, tools, and non-map downloads.
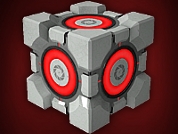
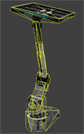
Light Beam Platform (from Portal 1)
Just because Portal 2 is a newer game there is no reason to waste old testing elements. A good example besides the Energy Balls (Working Energy Balls + Clean models + Instances) are the Light Beam Platforms. They can be used everywhere because they don't need any fixed points with walls like Portal 2's moving platforms. In this pack you have 5 instances: BeamPlatform_Beam: Here you have a preset env_beam where you have to set the start and endpoint of its beam. BeamPlatform_Corner: Thats the corner for a Light Beam Platform track. BeamPlatform_End: Thats the end platform for a Light Beam Platform track. BeamPlatform_Wall: This is a wall emitter for the Light Beam. For the first two instances the func_instance center is the point where you have to put your path_tracks to. The wall emitter needs to have the path_track on the same layer but of course a bit futher from the wall. BeamPlatform_Platform: Thats the platform itself with some settings. It's moving from MapSpawn on. Make sure to give all instances/parts that belong to the same Light Beam the same fixup name! For multiple platforms per track you have to use of course different ones. This just causes that the toggle won't work. In this pack there are also the missing models and textures for all the parts of the Light Beam Track. I recompiled the corner model and made it to a static prop. Please make sure to use the light_rail_endcap2.mdl and not the light_rail_endcap.mdl. I hexed that model because Valve made some texture tries on the original one in Portal 2's VPKs and it looks unfinished.


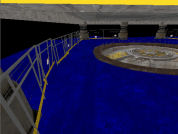
Underground giant door transition
My attempt at an underground transition seal, trying to re-create a4_end without copy-pasting. I was going to include it in my 'useful instances' - but it's too big and doesn't really fit into a category. Gaps have been left for you to plug doorways in to the North and South sides, as well as a gap for a descending elevator. Triggering the massive door to open is easy with just a few entities, but is beyond the scope of this text and will not be explained here. Check the forums!
Frames prefabs
This file contains two prefabs: one for a doorframe, one for a funnel frame. To use these, place them in steam/steamapps/common/portal 2/bin/Prefabs. In hammer, click the entity tool and then select prefabs, and choose the one you want to use.

Portals on Panels, Issue Clarification
I'm having an issue where portals placed on my rotating panels will only be oriented one specific way relative to the prop_dynamic (panel) inside of them. Here is a big, simple version of the problem I'm facing.
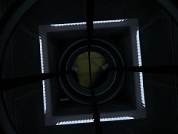
Core Socket Example
Core_socket.mdl usage example. Connect Wheatley to activate some of the testing elements.
Co-op tube ride sequence
This is an instance that when triggered causes a sequence in which Blue, Orange or both go flying through a set of vents, like the one that leads to and from the 'DLC room' in the hub. To activate it you need a trigger_playerteam that will tell the instance what sequence to start (Blue/Orange; Long/Short) and to enable/disable the trigger_teleports. You should also place two trigger_teleports - one for Orange and one for Blue. these should be enabled when the corresponding bot arrives and disabled when he leave's the trigger_playerteam brush. There are four alternate remote destinations for these brushes: @orange_tuberide_long_teleport_trigger @orange_tuberide_short_teleport_trigger @blue_tuberide_long_teleport_trigger @blue_tuberide_short_teleport_trigger You can also have up to four point_teleport entities, from these the player will re-appear in the map after the sequence: @orange_tuberide_long_teleport_trigger2 @orange_tuberide_short_teleport_trigger2 @blue_tuberide_long_teleport_trigger2 @blue_tuberide_short_teleport_trigger2 YOU MUST NAME THESE ENTITIES APPROPRIATELY, otherwise the instance won't work properly. Hope you'll make the best out of it, I'm sure I will.
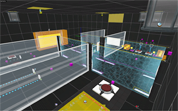
Test Map Pack Instances
This is a vmf with some of the instances I used to make various levels in my map packs. In it, you'll find how I made the moving button, portal sensitive panels, colored cubes, assembling room, and circuits. There are comments spread throughout the map in info_nulls or the entities themselves (cubes, buttons, etc). You can find the video for this here: http://www.youtube.com/watch?v=_gVYzo6_d8Y
Timed Button Example
A simple little puzzle I created for someone to demonstrate how to set up a timed button. It was meant to take five minutes to make, but I got distracted by something else, and then when I came back, I got carried away and made it a full-blown proof-of-concept puzzle. I was hoping my first upload would be something a little more exciting, but here you go. Don't download this if you're looking for an actual puzzle; this is the simplest one you could ever imagine. Known bugs: For some reason, the logic_playerproxy doesn't work, so PotatOS is on the portalgun.
arm64x64_interior with hitbox
This is the normal arm64x64_interior with all it's animations and skins but additional physical hitboxes. Now prop_physics or players can collide with it without any clip-brush. Clean and rusty skins are in 1 model. Skin 0-2 is clean, 3-5 is rusty. (0 normal, 1 off, 2 error) I recommend to use this model just if necessary (avoiding possible mistakes made due decompiling).
Explosive Cube Source map/stuff
Some of you may have noticed my WIP map pack including the explosive cube a LOOONG while back lol Well due to a lack of interest/motivation i kinda forgot about the project, But figured it might be an idea to upload the models/materials/map source in case other people might want to use it in their own maps! The way the explosive cube works is actually a complex mess of logic relays, Experienced users could probably figure it out by looking at the map source, But i also written an explanation in a readme file in the zip. If you use this stuff in your own maps please leave a note of who made it/possibly redirect to this page. Thx One or more textures on this map have been created with images from CGTextures.com. These images may not be redistributed by default. Please visit http://www.cgtextures.com for more information. EDIT: Forgot to actually explain how to install, Figured most people could probably figure it out: Copy models/materials folder into your Portal 2 folder, The .VMF file can go anywhere.