Portal 2 (Other files)
Miscellaneous Portal 2 mods, assets, tools, and non-map downloads.
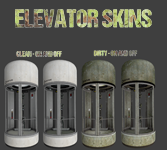
Elevator with Extra Skins
(As requested by Lonewolf) This is a default Portal 2 elevator model with 4 skins: Clean with light on, Clean with light off, Dirty with light on, and Dirty with light off. These correspond to skin0-skin3 in hammer respectively. High resolution preview: http://i.imgur.com/PqnpUqf.jpg To install, simply extract the zip to /steamapps/common/Portal 2/portal2/ (The readme basically says all this too) Please credit me for making this if used in a map, and also link me to the map on here because I'd love to see what you make of it

Co-op tube ride sequence
This is an instance that when triggered causes a sequence in which Blue, Orange or both go flying through a set of vents, like the one that leads to and from the 'DLC room' in the hub. To activate it you need a trigger_playerteam that will tell the instance what sequence to start (Blue/Orange; Long/Short) and to enable/disable the trigger_teleports. You should also place two trigger_teleports - one for Orange and one for Blue. these should be enabled when the corresponding bot arrives and disabled when he leave's the trigger_playerteam brush. There are four alternate remote destinations for these brushes: @orange_tuberide_long_teleport_trigger @orange_tuberide_short_teleport_trigger @blue_tuberide_long_teleport_trigger @blue_tuberide_short_teleport_trigger You can also have up to four point_teleport entities, from these the player will re-appear in the map after the sequence: @orange_tuberide_long_teleport_trigger2 @orange_tuberide_short_teleport_trigger2 @blue_tuberide_long_teleport_trigger2 @blue_tuberide_short_teleport_trigger2 YOU MUST NAME THESE ENTITIES APPROPRIATELY, otherwise the instance won't work properly. Hope you'll make the best out of it, I'm sure I will.
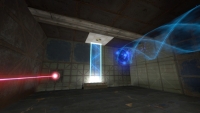
Core Socket Example
Core_socket.mdl usage example. Connect Wheatley to activate some of the testing elements.

TLFS Interactive Computer Mechanic
Due some recent stuff i decided to release this, i realized that was stupid from my part hold this only for myself =D. (besides, even that taken me months to figure out how to do it, in reality is not to hard to imagine how it works, so if you want to see how i did here it is =D) --------------------------------------------------------------------------- !!IT'S NOT AN INSTANCE!! Recommended for people that have a more advanced knowledge in hammer. (i will try to do an tutorial, but if someone do first i will be very thankful, because i'm not a very good teacher XD) FILE CONTAINS -. BSP to see how it is compiled - The necessary textures (for you to have an reference for do it your own) - VMF for you study how it works i will be glad if you put my name in the credits if you use =P

Underground styled test elements
These are instances for underground themed versions of: * laser * light bridge * tractor beam all of which are FULLY underground themed, NOT just the modern stuff re-colored and surrounded with old styled textures, meaning that no modern aperture stuff is visible in any of these outside of hammer. Please give any feedback, and credit me if you use these! thanks. Caden wrote:Screenshots of these instances in action. pics [spoiler] [/spoiler]
FlipCounter Instance (and vmf example)
I made this instance for my map and I managed to make it pretty much user friendly so I decided to share it. So it's basically a flip counter that goes from 0 up to 9(and loops) every time you trigger it. All you need to do is to put it as an instance and name it how you want. Trigger it with anything you want. And also you have a parameter for a starting value. Put any number from 0-9 and that will be the default number when the map spawns. I was having troubles getting the instance to return the value so it can trigger something else so I just figured a way to do that outside the instance with just one math_counter and one logic_case. It's all included in the example vmf. It looks pretty cool, I used panel animation to make the flipping look nicer. Although I wanted to make a real flipcounter where every number is split in half, but that would require twice as many brushes and 10 times a many patience .. it look cool enough Use it however you want, it's my gift to the community. Would be nice to credit me wherever you use it, but I'm not gonna hunt you if you don't
TSL_AutoDoor
This Autodoor Func_Instance as 4 optional Sises, extended with Windows, and 1 without winodws. UPDATE: New future build in, for Gameplay options: Lights On/Off IO_Proxy, and you can start in the dark. The Sises are : Only the door : 128x144x32 With Windows : 128x256x32, 128x384x32, 128x512x32 without Shoot Hole and 128x512x32 with Shoot Hole Read the document i included in the rar file for the paremeters and of settings and other explanations. Know Problem : Light indexing if you use my door and other light entities (not the Glass/Wall Lighting), but read the document i included. Issues: Non atm Fixed: - Lights by rotating the Func_Instace will be fail on 1 or both Window Sides its fixed as good as possible. If users still experians error on the lights please notify me. Requests: Door wide bringing to 128 instead of the 144 (by lpfreaky90) and will be looked in. (See the Topic for my Reaction) KEEP IN MIND TO REMOVE OLD FILES BEFORE YOU COPY THE NEW FILES! Regards Teddybeer
changelevel example + source
this is an example of how to make a changelevel. please read the readme file, it helps a lot. give feedback unfortunately i cannot create this into a instance as you have to change some of the values, then add it into the download (and no one want one thousand custom changelevels) so just stick to making one yourself.
Portal 2 Timers example
=================== Portal 2 timer examples =================== This is just an example map that includes the basics of 2 working timers (a countdown and a countup) that uses custom materials (numbers). The intention is to show the required entities and their inputs/outputs to understand the logic behind a timer made in the hammer editor. Also this method allows you the posibility to use your own custom typo/numbers to fit your map's aesthetics... For this example I used the typo "DIN Next LT Pro Condensed", because I think it's pretty much similar to the typo used by Valve for the signage lightboard; so if you are too lazy to make your own material and want to use it in a normal Portal2 map, it'll look good. So the purpose for this could be considered as merely didactic The basic idea under this method is to make an overlay with 10 frames (the ten numbers, from 0-9) and go changing its textureindex with the entity "env_texturetoggle". HOW TO MAKE YOUR OWN CUSTOM NUMBERS ---------------------------------------------------------------- 1. Open an image editor of your choice, take the font that you like and make 10 separate images, one per number (from 0 to 9), and REMEMBER to always give the image a size which values are a power of 2 (like 128x256 that I gave in this case). I prefer making .png files... you can do .tga as well... Whatever format that allows you recording an alpha channel (transparency) because this way, our numbers overlays would be stickable on whatever texture 2. Name each of them with a name followed by a suffix like "_0", "_1", "_2", and so on... Obviously, try to make that suffix coincides with the number into the image... lol. 3. Now open VTFEdit (http://nemesis.thewavelength.net/index.php?c=178) and go to File > Import. Now select at the same time (holding Ctrl or Shift keys down) all the ten image files. Do not resize the images. You can check into the "info" tab how the file contains 10 frames (each of them is a different number). I also made a cutie dots (":") to separate the seconds from the minutes and make them flicker: for this you need to make 2 textures, one with the dots and other completely empty but with the same size, then do the same as for the numbers, import them with VTFEdit selecting both at the same time. 4. Then save this file as .vtf into your "materials" folder (you can create whatever folder of your choice into /materials of course) giving it a whatever name. 5. Now you should create the .vmt file for the above .vtf file. Both names must be the same, only their extensions change... In this example, my .vmt file contains the following: UnlitGeneric { $baseTexture "josepezdj/numbers/black_numbers" $surfaceprop glass $translucent 1 "%keywords" portal $decal 1 Proxies { ToggleTexture { toggleTextureVar $baseTexture toggleTextureFrameNumVar $frame toggleTextureShouldWrap 0 } } } You can simply copy all that only replacing the path "josepezdj/numbers/black_numbers" by the one where your .vtf file is located and the name of your file. I guess it's clear. However, do not hesitate to ask whatever question or doubt Once created your custom texture for the ten numbers, check inside the attached .vmf in your hammer editor to see how you can set the timers up easily. Read the Readme.txt file for instructions info. A further post with an explanation in detail about how the timer system works is in the topic of this download, for those who doesn't really extract much info from the vmf file... josepezdj

Cube Dropper Example
The first thing i made in hammer, i started using hammer about 2 weeks ago and wanted to do something. This is my version of a cube dropper without instances, i combined the tutorial of portal cube droppers and some of my ideas for outputs. You can get a cube by pressing the button and then you can destroy it and get another one by pressing the button again or throwing the cube into the toxic slime. Pls give some feedback and rate. And remember, when life gives you lemons, burn someones house down.